Transform your iPhone into a powerful infrared camera capable of capturing stunning otherworldly images without expensive specialized equipment. Modern iPhones’ advanced sensors, combined with the right IR filters and apps, unlock a whole new spectrum of creative possibilities that were once exclusive to professional IR cameras. While traditional IR photography required complex camera modifications, today’s iPhone photographers can achieve remarkable infrared effects using readily available tools and techniques. From revealing invisible heat signatures to creating surreal landscapes where foliage glows white and skies turn dramatically dark, infrared photography on iPhone opens up an entirely new way of seeing and capturing the world around us. This guide will walk you through everything you need to know about shooting, processing, and mastering infrared photography using just your iPhone and a few key accessories.
How iPhones Can Capture Infrared Light
The Truth About iPhone Sensors
Modern iPhones come equipped with sophisticated camera sensors that have a unique relationship with infrared light. By default, these sensors include an IR cut filter (also known as a hot mirror) that blocks most infrared light from reaching the sensor. This filter ensures that your everyday photos maintain natural colors and aren’t affected by IR interference.
However, the iPhone’s sensor itself is actually capable of detecting infrared light – it’s just that the built-in filter prevents it from doing so. This is similar to how human eyes work: while we can’t see IR light, the photoreceptors in our retinas could potentially detect it if it weren’t for natural filtering.
The base sensitivity of iPhone sensors to infrared light varies between models, with newer versions typically having more effective IR blocking. This is why you might notice that older iPhones sometimes show the infrared light from TV remotes as a purple glow when viewed through the camera, while newer models might not display this effect at all.
For serious infrared photography, you’ll need to work around these limitations using external filters or modifications, as the built-in IR blocking is a permanent feature of the phone’s hardware.
iPhone Models Best Suited for IR Photography
When it comes to IR photography capabilities, not all iPhone models are created equal. The iPhone 12 Pro and newer models stand out as particularly suitable choices, thanks to their advanced sensor technology and improved light sensitivity. These models feature enhanced Night mode capabilities that make them more receptive to near-infrared light.
The iPhone 13 Pro and iPhone 14 Pro series take things further with their larger sensors and superior low-light performance. Their ProRAW format also allows for better post-processing of IR images, giving photographers more control over the final result.
Older models like the iPhone X and iPhone 11 can still capture IR photos, but you’ll likely need stronger IR filters and more controlled lighting conditions to achieve good results. The iPhone SE (2nd generation) and later versions perform adequately for basic IR photography, though they may require additional equipment for optimal results.
It’s worth noting that the effectiveness of IR photography on any iPhone model also depends heavily on the quality of your IR filter and the shooting conditions. Even the latest models will benefit from using dedicated IR filters and proper shooting techniques.
Essential Equipment for iPhone IR Photography
IR Filters: Your Gateway to Infrared
IR filters are the essential tools that unlock the mystical world of infrared photography on your iPhone. These specialized filters block visible light while allowing infrared wavelengths to pass through, creating those distinctive otherworldly effects that make IR photography so captivating.
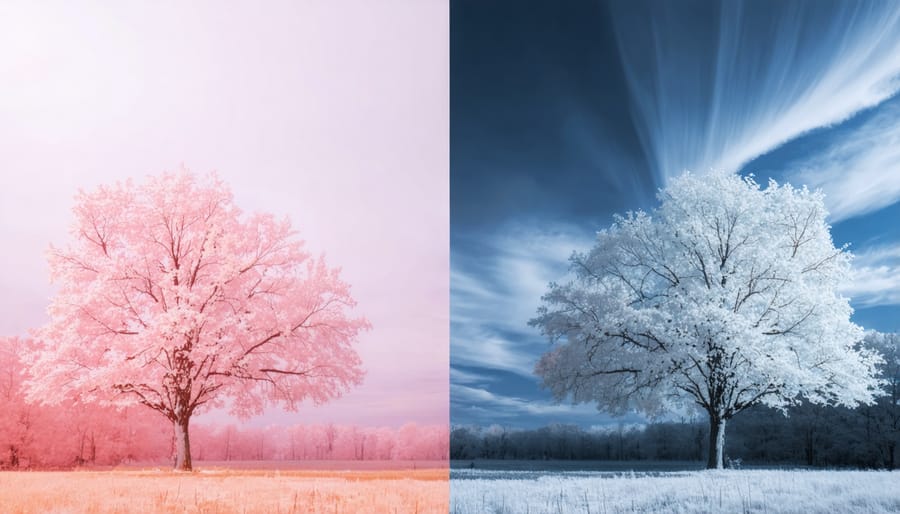
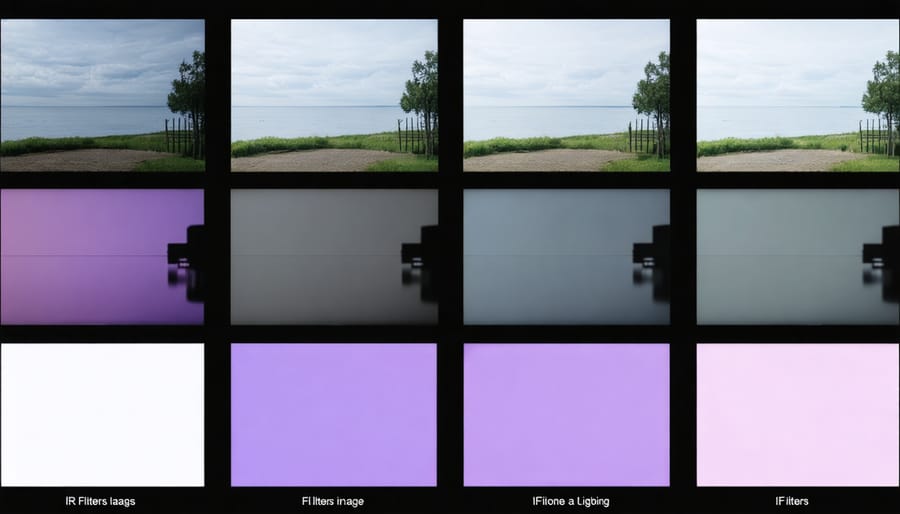
The most common IR filter for iPhone photography is the 720nm filter, which offers a great balance between infrared effects and usability. This filter produces the classic white foliage and dark skies that IR photography is famous for, making it perfect for beginners. For more dramatic results, the 850nm filter creates stronger contrast and deeper blacks, though it requires longer exposure times.
For those seeking extreme effects, the 950nm filter delivers the most dramatic results, producing almost completely monochromatic images with stark contrasts. However, this filter demands more patience and expertise, as it blocks nearly all visible light.
When choosing an IR filter, consider the screw-on varieties that attach directly to lens adapters, or the more convenient clip-on options designed specifically for iPhones. Quality matters – invest in filters from reputable manufacturers to avoid color casting and ensure optimal light transmission.
Remember that different IR filters produce varying color shifts. The 720nm might show some color information, creating interesting false-color effects that you can manipulate in post-processing. Higher nanometer ratings like 850nm and 950nm progressively reduce color information, leading to more dramatic black-and-white results.
Pro tip: Start with a 720nm filter if you’re new to IR photography. It’s more forgiving in terms of exposure times and offers enough creative possibilities to help you understand the basics before exploring more specialized options.
Filter Mounting Solutions
Attaching IR filters to your iPhone requires some creative problem-solving, but several effective solutions are available. The most straightforward approach is using a clip-on filter mount, which securely holds the IR filter in front of your iPhone’s camera lens. These mounts typically feature a universal design that works with various iPhone models and can accommodate different filter sizes.
For those who prefer a more professional setup, dedicated iPhone filter cases offer a robust solution. These cases come with built-in filter threads, allowing you to screw in standard photographic filters, including IR filters. Popular brands like Moment and ShiftCam produce high-quality cases that maintain your phone’s slim profile while adding filter mounting capabilities.
DIY enthusiasts might consider creating a custom filter holder using a phone case and step-up rings. This method involves attaching a filter adapter to a basic phone case using strong adhesive, creating a permanent mount for your IR filters. While this approach requires some handiwork, it’s cost-effective and can be customized to your specific needs.
When choosing a mounting solution, consider factors like:
– Ease of attachment and removal
– Compatibility with your specific iPhone model
– Filter size requirements
– Build quality and durability
– Impact on phone handling and portability
For temporary solutions, some photographers use elastic bands or specialized filter holders designed for mobile phones. While these methods work in a pinch, they’re less stable and might affect image quality due to potential light leaks or misalignment. Whatever mounting solution you choose, ensure it holds the filter firmly and parallel to your phone’s lens to avoid unwanted artifacts in your infrared photographs.
Mastering iPhone IR Photography Techniques
Camera Settings and Apps
To capture stunning infrared photos with your iPhone, you’ll need to focus on both optimal camera settings and specialized apps. Start by locking your iPhone’s focus and exposure by tapping and holding on your subject. This prevents the camera from continuously adjusting and ensures consistent results.
For the best IR photography results, use the ProRAW format if your iPhone supports it (iPhone 12 Pro and newer models). This gives you more flexibility in post-processing and helps preserve the unique infrared details. Set your exposure compensation slightly higher than normal, as IR photos often require more light to capture the invisible spectrum effectively.
Several apps enhance your IR photography capabilities. Specialized apps like NightCap Camera and ProCam 8 offer manual controls specifically beneficial for infrared photography. These apps allow you to adjust ISO, shutter speed, and white balance – crucial parameters for IR shots. For post-processing, apps like Snapseed and Lightroom Mobile help enhance the ethereal qualities of your infrared images.
Remember to keep HDR turned off when shooting IR, as it can create unwanted artifacts. If your iPhone has multiple cameras, the wide-angle lens typically works best with IR filters due to its larger aperture and better light-gathering capabilities. Experiment with different apps and settings to find the combination that best suits your creative vision.
Composition Tips for IR Images
Creating compelling infrared photos requires a slightly different approach than traditional photography, as the unique characteristics of IR light can dramatically alter how scenes appear. While many landscape photography composition techniques still apply, there are some specific considerations for IR imagery.
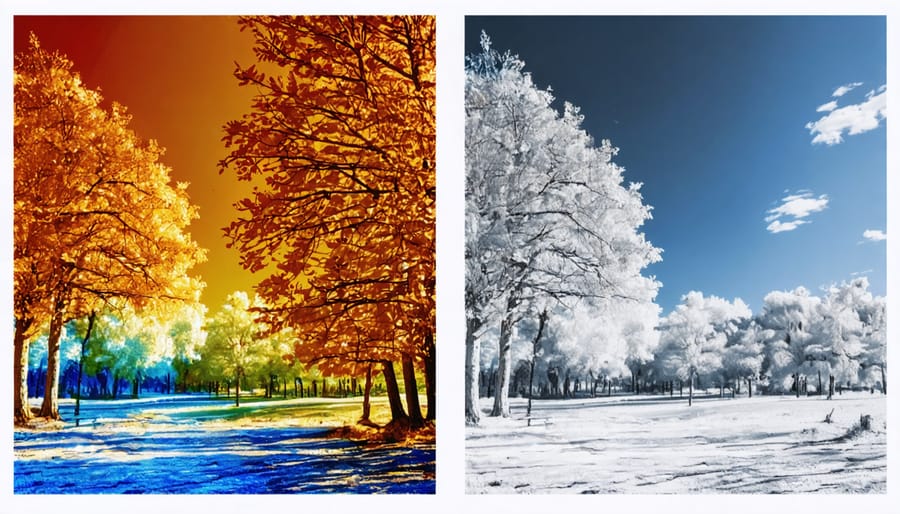
First, focus on finding scenes with strong contrasts between organic and inorganic materials. Living plants reflect IR light intensely, appearing bright white, while skies and water typically appear dark. This natural contrast creates dramatic compositions that draw the viewer’s eye.
Look for scenes with abundant foliage, as leaves and grass create ethereal, glowing effects in IR. Position these elements against darker backgrounds like buildings or water features to maximize impact. The interplay between light and shadow becomes even more crucial in IR photography.
When composing your shot, pay attention to the direction of light. IR photos often work best during mid-day sun, contrary to traditional photography rules. The strong overhead light maximizes IR reflection from vegetation, creating that distinctive otherworldly glow.
Consider including architectural elements in your compositions. The stark contrast between man-made structures and glowing vegetation can create compelling visual stories. Frame your shots to include both elements, using leading lines and the rule of thirds to guide viewers through your supernatural-looking scene.
Remember to experiment with different angles and perspectives, as familiar scenes can take on entirely new characteristics in infrared.
Post-Processing Your IR Photos
Post-processing is where the magic of infrared photography truly comes alive. While your iPhone captures the initial IR image, mastering essential post-processing techniques will transform your photos into striking artistic works.
Start by adjusting the white balance to tackle the strong red cast typical in IR photos. In apps like Snapseed or Lightroom Mobile, slide the temperature towards blue to neutralize this effect. Next, experiment with the channel mixer to create the distinctive IR look – try swapping the red and blue channels for that ethereal white foliage effect.
Contrast adjustment is crucial in IR photography. Since infrared images often appear flat straight out of camera, boost the contrast to add depth and dimension. Pay special attention to the highlights and shadows, as IR photos can handle more dramatic adjustments without losing detail.
For a classic IR look, consider converting your image to black and white. This emphasizes the surreal nature of IR photography, with bright white vegetation against dark skies. Don’t be afraid to push the clarity and texture sliders to enhance the otherworldly effect.
Finally, remove any hot spots or artifacts that might appear as bright circles in the center of your image. Use the spot healing tool or careful exposure adjustment to maintain a clean, professional look throughout your composition.
Common Challenges and Solutions
Exposure Issues
Shooting infrared photography on iPhone presents unique exposure challenges due to the camera’s automatic settings being calibrated for visible light. The iPhone’s light meter can be easily fooled when dealing with IR wavelengths, often resulting in over or underexposed images.
To achieve proper exposure, start by using the iPhone’s exposure compensation feature. Tap and hold on your subject, then slide up or down to adjust exposure. IR scenes typically require +1 to +2 stops of exposure compensation, as foliage and sky appear differently in infrared.
When shooting through IR filters, you’ll notice significantly reduced light transmission. Combat this by shooting in bright, direct sunlight and stabilizing your iPhone, as longer exposure times are often necessary. The ProRAW format, available on newer iPhone models, provides greater flexibility for exposure adjustments in post-processing.
Pay special attention to highlights, as IR photography can create striking white effects on vegetation. Use the iPhone’s HDR feature to retain detail in both highlights and shadows, particularly when photographing scenes with high contrast, such as IR landscapes with both foliage and sky.
Focus and Sharpness
Achieving sharp infrared photos with your iPhone requires careful attention to focus and stability. Since infrared light focuses differently than visible light, you’ll need to make some adjustments to your usual photography techniques. First, ensure your iPhone is completely steady by using a tripod or stabilizing it against a solid surface, as IR photography often requires longer exposure times.
When focusing, tap on your main subject and hold until the AE/AF lock activates. This prevents your iPhone from continuously trying to refocus, which can be particularly problematic in IR photography. For landscape shots, focus about one-third into the scene to maximize depth of field. If you’re using an IR filter, focus before attaching it to ensure accuracy.
Keep in mind that bright IR sources, like foliage, can sometimes cause focus issues. In such cases, try focusing on a high-contrast edge within your composition. Using the iPhone’s grid feature can help maintain straight horizons and proper alignment, which is especially important when shooting IR landscapes. For maximum sharpness, use your iPhone’s timer function to eliminate any camera shake from touching the screen.
Remember that movement in your scene, such as swaying leaves or moving clouds, can create subtle blur in IR photos, so choosing the right moment to capture your image is crucial.
Infrared photography with your iPhone opens up a fascinating new world of creative possibilities. Whether you’re using specialized filters, modified lenses, or IR camera apps, the techniques we’ve explored can help you capture stunning infrared images that stand out from conventional photography. Remember that successful IR photography requires patience and experimentation – don’t be afraid to try different approaches and settings to achieve your desired results. The accessibility of iPhone IR photography means you can start exploring this unique medium without investing in expensive specialized equipment. Take advantage of golden hour lighting, seek out interesting foliage, and push the boundaries of your creative vision. With practice and the right techniques, your iPhone can become a powerful tool for capturing the invisible world of infrared light. Start experimenting today, and share your infrared creations with the photography community – you might just inspire others to explore this captivating form of artistic expression.