Position yourself at the golden hours – sunrise and sunset – when soft, directional light transforms ordinary landscapes into extraordinary scenes. Master the fundamentals of composition by applying the rule of thirds, leading lines, and natural frames to create compelling landscape photography secrets that captivate viewers. Understand your camera’s manual settings to control depth of field, capturing sharp details from foreground to background using apertures between f/8 and f/16. Scout locations in advance, studying weather patterns, sun positions, and seasonal changes to anticipate the perfect conditions for your shot. Invest in essential gear – a sturdy tripod, graduated neutral density filters, and a wide-angle lens – but remember that technical knowledge and artistic vision matter more than equipment. The most compelling landscape photographs combine technical precision with emotional impact, transforming fleeting moments into timeless images that tell stories of place and perspective.
Essential Gear for Stunning Landscapes
Camera Bodies and Lens Selection
When it comes to landscape photography, your choice of camera body and lenses can significantly impact your creative possibilities. While it’s true that great landscapes can be captured with almost any camera, certain features can make your journey easier and more rewarding.
For camera bodies, weather sealing is a valuable feature since you’ll often shoot in challenging conditions. Full-frame sensors offer excellent dynamic range and low-light performance, though crop-sensor cameras can still produce stunning results. Look for cameras with good battery life and built-in GPS for location tracking.
Lens selection is crucial for landscape work. A wide-angle lens (14-35mm) is often considered essential, allowing you to capture sweeping vistas and dramatic foregrounds. For more versatility, consider a mid-range zoom (24-70mm) for general landscape work. Don’t overlook telephoto lenses (70-200mm or longer) – they’re excellent for compressing perspective and isolating distant elements in your composition. If you’re interested in panoramic photography, a standard zoom lens often works better than an ultra-wide angle.
Quality filters are as important as your lenses. A polarizing filter helps manage reflections and enhance colors, while neutral density filters allow for longer exposures. Whatever gear you choose, prioritize image quality and durability over having the absolute latest technology.
Must-Have Accessories
Every landscape photographer needs a carefully chosen set of accessories to capture those perfect moments in nature. A sturdy tripod is absolutely essential – it’s your best friend for achieving tack-sharp images, especially in low light conditions or when using slower shutter speeds. Look for one that’s both lightweight for easy carrying and stable enough to handle windy conditions.
Filters are another crucial component of your landscape kit. A circular polarizing filter helps manage reflections and enhances color saturation, particularly useful for deepening blue skies and reducing glare from water surfaces. Neutral density (ND) filters are invaluable for creating those silky-smooth water effects and allowing for longer exposures even in bright daylight.
A remote shutter release helps eliminate camera shake during long exposures, while a lens hood protects against unwanted lens flare and light leaks. Don’t forget practical accessories like a reliable camera bag that’s weather-resistant and comfortable for long hikes, and a lens cleaning kit to keep your glass spotless in dusty or misty conditions.
For serious landscape work, consider investing in a L-bracket for your camera, which makes switching between landscape and portrait orientations much easier while keeping your camera properly balanced on the tripod. Lastly, always pack extra memory cards and batteries – there’s nothing worse than missing the perfect shot because you’ve run out of either.
Mastering Composition Techniques
Leading Lines and Rule of Thirds
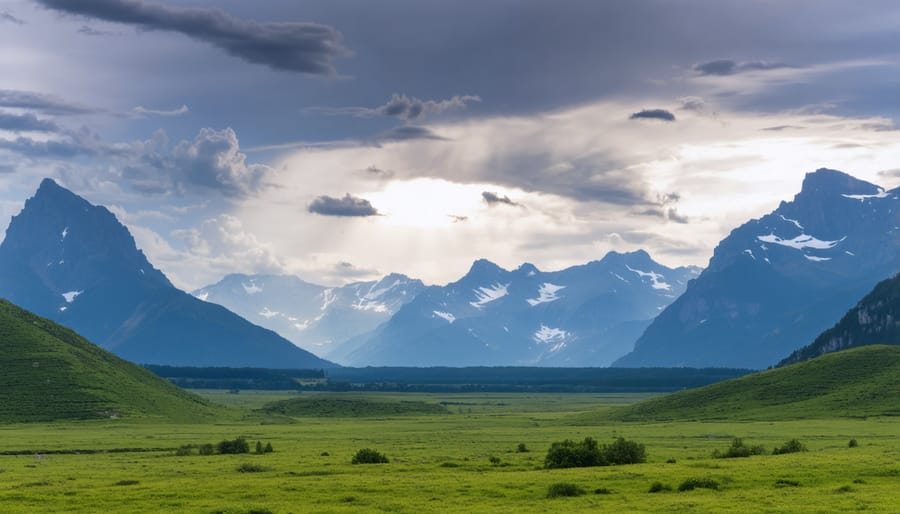
Mastering composition in landscape photography starts with two fundamental principles that can transform your images from ordinary to extraordinary. The rule of thirds divides your frame into a 3×3 grid, creating four intersection points where you can place key elements of your scene. When photographing landscapes, try positioning your horizon line along either the upper or lower third line rather than dead center. For mountain scenes, align peaks with the intersection points to create more dynamic compositions.
Leading lines are natural or man-made elements that guide the viewer’s eye through your image. In landscape photography, these might be winding rivers, mountain ridges, fallen trees, or even fences cutting through a field. The key is to use these lines intentionally, directing attention toward your main subject or creating depth in your composition.
To effectively combine these principles, look for natural leading lines that flow toward points of interest positioned at the rule of thirds intersections. For example, if you’re shooting a beach scene, try positioning the shoreline diagonally from the lower corner, leading toward a dramatic sunset or rock formation placed at an upper intersection point.
Remember that while these rules provide excellent guidelines, they’re meant to be understood and sometimes broken. The most important aspect is creating a composition that draws viewers in and keeps their attention moving through your image in an intentional way.
Foreground Interest and Depth
One of the most effective ways to create captivating landscape photos is to incorporate strong foreground elements that lead the viewer’s eye into the scene. Start by looking for interesting rocks, flowers, fallen leaves, or patterns in the sand that can serve as anchor points in your composition. These elements not only add visual interest but also create a sense of scale and perspective.
To maximize depth in your images, position yourself low to the ground when shooting foreground elements. This technique emphasizes their size and importance while creating a more dynamic relationship with the background. Using a wide-angle lens (14-35mm) will help you capture both close foreground details and distant elements while maintaining sharpness throughout the frame.
Consider using leading lines in your foreground, such as paths, streams, or rock formations that naturally guide the viewer’s gaze toward your main subject. When composing your shot, try to create three distinct planes: foreground, middle ground, and background. This layered approach adds dimensionality and makes viewers feel as though they could step right into the photograph.
Remember to use appropriate aperture settings to maintain sharpness throughout your image. For maximum depth of field, start with f/11 or f/16, but be mindful of diffraction at extremely small apertures. Focus stacking might be necessary when working with very close foreground elements to ensure everything remains tack-sharp from front to back.
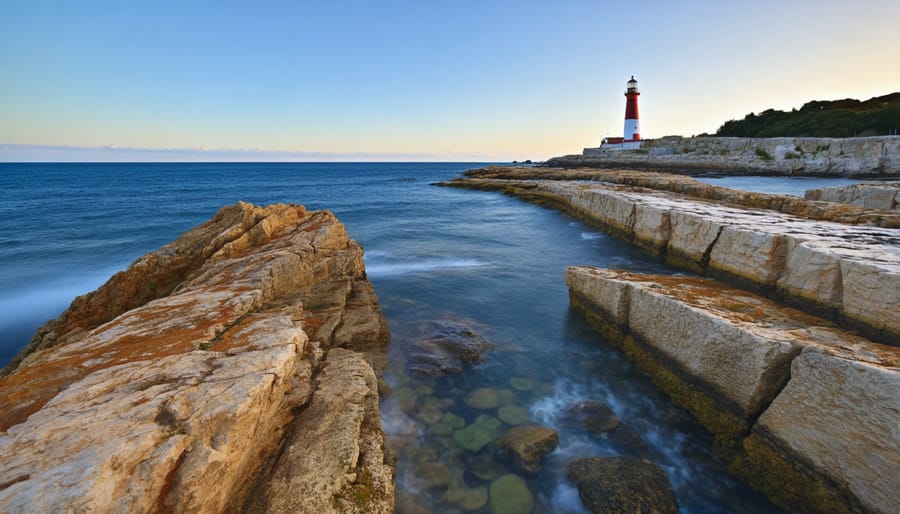
Natural Framing Elements
Natural framing elements are powerful compositional tools that can transform an ordinary landscape photo into a captivating visual story. Trees, archways, rock formations, and other natural elements can serve as perfect frames to draw attention to your main subject while adding depth and context to your images.
Look for overhanging branches or tree trunks that can frame your scene from the sides or top. These natural frames work particularly well when photographing mountains, lakes, or distant landscapes. Position yourself so that the framing elements create a window-like effect, guiding the viewer’s eye toward the focal point of your composition.
Cave openings and rock arches offer dramatic framing opportunities, especially during sunrise or sunset when the light creates beautiful silhouettes. When using these elements, ensure your exposure accounts for both the darker frame and the brighter scene beyond.
Consider seasonal changes in your framing elements. Summer foliage provides lush, full frames, while winter branches create more delicate, intricate framing patterns. Fog and mist can also act as natural frames by creating atmospheric depth around your subject.
Remember to experiment with different positions and perspectives. Sometimes moving just a few steps left or right can dramatically improve how your natural frame enhances the overall composition. Pay attention to the balance between your framing elements and the main subject – the frame should complement, not overwhelm, your intended focal point.
Light and Timing
Golden and Blue Hours
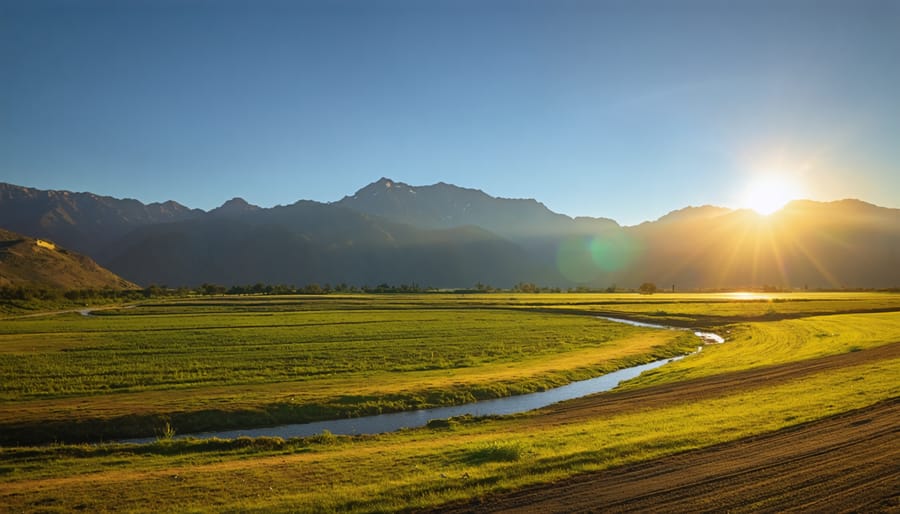
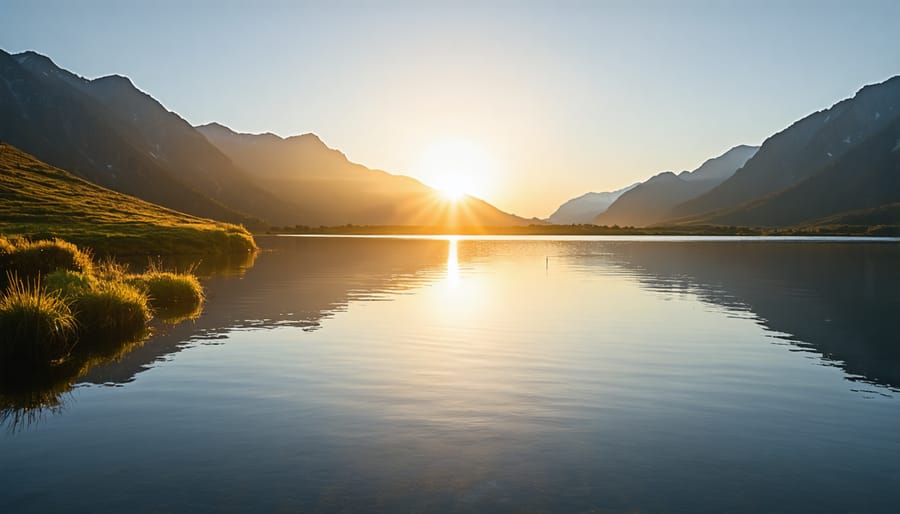
The magic of landscape photography often lies in capturing the perfect light, and nothing beats the ethereal quality of the golden and blue hours. These fleeting periods offer photographers the most dramatic and flattering natural lighting conditions for stunning landscape shots.
The golden hour occurs twice daily: just after sunrise and before sunset. During these precious moments, the sun sits low on the horizon, casting warm, golden light that creates long, dramatic shadows and adds depth to your compositions. The soft, directional light reduces harsh contrasts and bathes landscapes in rich, warm tones that can transform an ordinary scene into something extraordinary.
The blue hour, which precedes sunrise and follows sunset, presents an entirely different but equally captivating opportunity. This brief window provides soft, diffused light with cool, blue tones that work beautifully for moody landscape shots. It’s also an excellent time to experiment with night photography techniques as the light transitions between day and night.
To make the most of these magical hours, arrive at your location at least 30 minutes before the desired shooting time. This allows you to scout compositions and set up your equipment without rushing. Use apps like PhotoPills or The Photographer’s Ephemeris to plan your shoots by tracking the exact timing of golden and blue hours at your specific location.
Remember that while these periods offer optimal lighting conditions, they’re also brief. Work efficiently and have your compositions planned in advance. Consider bracketing your exposures during these times, as the dramatic lighting can create challenging exposure situations.
Weather and Atmospheric Conditions
Weather conditions play a crucial role in landscape photography, often making the difference between a good shot and a spectacular one. Different weather patterns create unique opportunities and challenges that can dramatically impact your images.
Overcast skies act as a natural diffuser, perfect for capturing waterfalls and forests as they eliminate harsh shadows and reduce contrast. These conditions are ideal for shooting during midday when direct sunlight would typically be too harsh. For mountain landscapes and seascapes, partly cloudy conditions can add drama and depth, creating dynamic light patterns that add interest to your composition.
Stormy weather, while challenging, offers incredible opportunities for dramatic shots. Lightning, dark clouds, and rain can create moody atmospheres that tell powerful stories. Just remember to protect your gear and ensure your safety first. For these conditions, consider adjusting your evening photography settings to capture the darker atmosphere effectively.
Fog and mist can transform ordinary scenes into ethereal landscapes. These conditions work particularly well in woodland areas or mountainous regions, adding depth and mystery to your images. Early morning fog often creates magical conditions, especially when combined with sunrise light.
Golden hour and blue hour remain the prime times for landscape photography, regardless of weather conditions. However, don’t dismiss “bad” weather – some of the most compelling landscape photos are taken during or immediately after storms when the light and atmosphere are most dramatic. The key is to be prepared for various conditions and understand how to work with, rather than against, the weather you’re given.
Camera Settings for Sharp Landscapes
Aperture and Depth of Field
In landscape photography, mastering aperture is crucial for achieving those crisp, stunning vistas that draw viewers into your images. While learning camera settings for nature photography can seem daunting at first, understanding f-stops is simpler than you might think.
For most landscape scenes, you’ll want to maximize your depth of field to ensure everything from nearby rocks to distant mountains appears sharp. This typically means using smaller apertures (larger f-numbers) between f/8 and f/16. However, don’t automatically jump to f/22 – while it might seem logical that the smallest aperture would provide the greatest sharpness, diffraction at very small apertures can actually reduce overall image quality.
A good starting point is f/11, which typically provides excellent edge-to-edge sharpness while avoiding diffraction issues. This sweet spot works particularly well when you’re shooting with a wide-angle lens and want both your foreground elements and background to remain tack-sharp.
Remember to consider your focal point carefully – generally, focusing about one-third into the scene (also known as the hyperfocal distance) will help maximize your depth of field. Modern cameras often include hyperfocal guides or apps that can help you calculate this precisely, but with practice, you’ll develop an intuitive sense for it.
Focus Stacking Techniques
Focus stacking is a game-changing technique that helps you achieve tack-sharp images from foreground to background – something that’s often impossible to capture in a single shot. By taking multiple photos at different focus points and combining them in post-processing, you can create stunning landscape images with exceptional detail throughout.
To get started, you’ll need your camera mounted on a sturdy tripod. Begin by identifying your focal points – typically, you’ll want at least three: one for the immediate foreground, one for the middle ground, and one for the background. Set your camera to manual focus and take a series of images, adjusting the focus point between each shot. Make sure there’s some overlap between the focal areas to ensure smooth transitions.
For the best results, maintain consistent exposure settings across all shots. Start with the closest element and work your way to infinity, taking care not to move the camera between shots. Depending on the scene’s complexity and depth, you might need anywhere from 3 to 15 images.
When processing, software like Photoshop, Helicon Focus, or Zerene Stacker can automatically align and blend your images. Pay special attention to the masking process, as this is where you might need to make manual adjustments to ensure natural-looking transitions between focus areas.
Remember that focus stacking works best in situations with minimal movement – early morning or evening shoots when there’s less wind are ideal times to practice this technique.
Long Exposure Effects
Long exposure photography can transform ordinary landscapes into ethereal masterpieces by capturing the movement of elements over time. Using slower shutter speeds, typically ranging from several seconds to several minutes, allows you to create stunning effects with moving water, clouds, and other dynamic elements in your scene.
To achieve silky-smooth waterfalls or misty seascapes, start with shutter speeds around 1-2 seconds. As you become more comfortable, experiment with longer exposures of 30 seconds or more to capture dramatic cloud movements or star trails. A sturdy tripod is absolutely essential for these shots, as even the slightest camera movement will result in unwanted blur.
Neutral Density (ND) filters are your best friends for long exposures during daylight hours. These dark pieces of glass reduce the amount of light entering your lens, allowing for extended shutter speeds even in bright conditions. Consider starting with a 6-stop ND filter, which provides enough light reduction for most situations.
For the best results, shoot during the blue hour or golden hour when light levels are naturally lower. Focus on compositions that include moving elements contrasted against static objects – think rushing water against solid rocks, or moving clouds above mountain peaks. Remember to use your camera’s built-in timer or a remote shutter release to prevent camera shake when triggering the exposure.
Now that you’re equipped with these landscape photography techniques, it’s time to put them into practice. Remember, mastering landscape photography is a journey that requires patience, dedication, and countless hours in the field. Don’t be discouraged if your first attempts don’t match your vision – every experienced landscape photographer started exactly where you are now.
Start by choosing a familiar location near your home. This allows you to visit repeatedly under different conditions, helping you understand how light, weather, and seasons affect your compositions. Keep a photography journal to track your settings, locations, and lessons learned from each shoot.
Make it a habit to check weather forecasts and plan your shoots around golden and blue hours. Challenge yourself to photograph the same scene in different conditions – you’ll be amazed at how varied your results can be. Join local photography groups or online communities where you can share your work and learn from others’ experiences.
Set yourself monthly goals, whether it’s mastering a new technique, exploring a specific location, or perfecting your post-processing workflow. Consider creating a project that focuses on one aspect of landscape photography, such as waterscapes or mountain vistas.
Remember, the best camera is the one you have with you, and the best technique is the one that helps you capture your unique vision. So pack your gear, head outdoors, and start creating images that tell your story of the natural world.