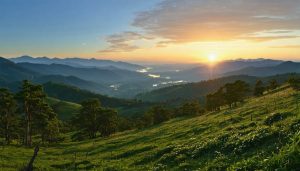
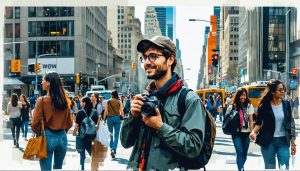
Set your camera to aperture priority mode and experiment with different f-stops to control depth of field. A low f-number like f/2.8 will create a shallow depth of field, ideal for portraits, while a high f-number like f/11 will keep more of the scene in focus, perfect for landscapes. Choose the right entry-level gear with manual controls to enable these settings.
Adjust shutter speed to capture or freeze motion. Slow shutter speeds below 1/60th of a second can create artistic blur for moving subjects like waterfalls. Fast shutter speeds above 1/500th will freeze fast action like sports or wildlife. Use a tripod for slow shutter speeds to avoid camera shake and improve photo quality.
Master ISO to shoot in any lighting conditions. Low ISO values like 100-400 work best in bright light, while higher ISOs like 1600+ help capture low light scenes. Be mindful of digital noise at extreme ISO levels.
Aperture: Controlling Depth of Field
How Aperture Works
The aperture works much like the pupil of your eye, controlling the amount of light entering the camera. Just as your pupils expand in dim environments to let in more light and constrict in bright conditions, a wider aperture (lower f-number) allows more light to pass through the lens, while a narrower aperture (higher f-number) reduces the light entering the camera.
Imagine the lens as a water faucet and the aperture as the valve controlling the water flow. A wide-open valve lets more water through, just as a wide aperture allows more light to enter. Conversely, a mostly closed valve restricts water flow, much like a narrow aperture limits the amount of light reaching the sensor.
Aperture also impacts depth of field – the range of sharpness in an image from front to back. Picture looking through a keyhole: you see a limited area in focus. That’s akin to a shallow depth of field produced by a wide aperture. Now imagine peering through a doorway; you perceive more of the scene sharply. That’s similar to the deeper depth of field created by a narrow aperture.
Creative Effects of Aperture
Aperture is one of the most powerful creative tools in a photographer’s arsenal. By adjusting the size of the lens opening, you can dramatically change the look and feel of your images. A wide aperture like f/2.8 or f/4 will create a shallow depth of field, blurring the background and making your subject pop. This is perfect for portraits, allowing you to isolate your subject from a busy background.
On the other hand, a narrow aperture like f/11 or f/16 will give you a deep depth of field, keeping both foreground and background elements in sharp focus. This is ideal for landscapes, architecture, or any scene where you want to maintain detail throughout the image.
Aperture also affects the overall brightness of your photo. Opening up to a wider aperture lets in more light, which can be helpful in low-light situations. However, it’s important to balance this with your shutter speed and ISO to avoid overexposure.
Experimenting with different aperture settings is a great way to unleash your creativity and take control of your images. Try shooting the same scene at various f-stops and observe how the depth of field changes. You’ll quickly develop an intuitive sense of which apertures work best for different subjects and situations.
Remember, there’s no “right” or “wrong” aperture – it all depends on your creative vision and the story you want to tell through your photograph. So don’t be afraid to play around and see what works for you! With practice, you’ll master the art of using aperture to create stunning, expressive images that captivate your viewers.

Shutter Speed: Capturing or Freezing Motion
Mastering Motion Blur
Motion blur is a powerful creative tool that can add a sense of movement and energy to your images. By using slow shutter speeds, you can capture the motion of moving subjects like flowing water, passing cars, or people walking. The key is finding the right balance between shutter speed and subject movement.
For silky smooth waterfalls, try using a tripod and setting your camera to shutter priority mode (usually labeled as “S” or “Tv”). Start with a shutter speed around 1/15th of a second and adjust based on the speed of the water. If the water is moving quickly, you may need an even slower shutter speed like 1/4th or 1/2 a second. Use a smaller aperture (higher f-number) for greater depth of field and to compensate for the longer exposure time.
Panning is another effective technique for conveying motion. Follow your moving subject with the camera as you take the shot, keeping your camera moving at the same speed as the subject. This will blur the background while keeping your subject relatively sharp, creating a striking contrast that emphasizes the sensation of movement.
Remember, experimentation is key. Play around with different shutter speeds and subject speeds to find the look you desire. Don’t be afraid to take lots of shots – the beauty of digital photography is that you can review and adjust on the fly. With practice, you’ll develop a feel for the right settings to creatively capture motion in a variety of scenarios.

Tack-Sharp Action Shots
Capturing tack-sharp images of fast-moving subjects can be challenging, but with the right camera settings, you’ll be freezing action like a pro in no time. The key is to use a fast shutter speed that’s quick enough to eliminate motion blur. For most action shots, you’ll want to start with a shutter speed of at least 1/500th of a second and adjust from there based on the speed of your subject.
To achieve these quick shutter speeds, you’ll likely need to use a wider aperture (lower f-number) and higher ISO setting. A wide aperture like f/2.8 or f/4 lets in more light, allowing for faster shutter speeds. Just be aware of your depth of field, as wider apertures result in a shallower focus area. Increasing your ISO makes the camera more sensitive to light, also enabling quicker shutter speeds, but be mindful of potential noise or grain at very high ISO values.
Another tip is to use your camera’s continuous or burst shooting mode when photographing action. This will let you capture multiple frames per second, increasing your chances of nailing the perfect shot. Be sure to use a fast memory card with ample storage space to keep up with the rapid-fire shooting.
When it comes to focusing, switch your lens to AF (autofocus) mode and select the continuous or AI Servo AF setting. This will make the camera continuously adjust focus as your subject moves, keeping them sharp. For erratic or fast-moving subjects, use your camera’s dynamic or tracking AF area mode to let the camera automatically follow the subject and maintain focus.
By combining quick shutter speeds, wide apertures, higher ISOs, burst mode, and continuous autofocus, you’ll be well-equipped to capture crystal-clear action shots that freeze the excitement of the moment. Remember, these settings are just a starting point, so don’t be afraid to experiment and make adjustments based on your specific shooting situation and creative vision. With practice and persistence, you’ll be capturing tack-sharp action shots like the pros.

ISO: Brightening or Darkening Your Photos
When to Boost ISO
While lower ISO settings are ideal for bright, sunny conditions, there are times when you may need to boost your camera’s ISO to capture the perfect shot. Low-light environments, such as indoor events, night photography, or even heavily shaded areas, often require higher ISOs to maintain proper exposure without introducing camera shake or motion blur.
When shooting in low-light environments, start by gradually increasing your ISO until you achieve an acceptable exposure. Keep in mind that higher ISOs can introduce digital noise, so it’s essential to find the right balance between exposure and image quality. Many modern cameras have impressive high-ISO performance, allowing you to shoot at ISO 1600, 3200, or even higher without significant loss of detail.
Another scenario that may call for a higher ISO is when you need a faster shutter speed to freeze action or avoid camera shake. For example, if you’re photographing a moving subject in low light, such as a dancer on a dimly lit stage, you may need to boost your ISO to maintain a fast enough shutter speed to capture the motion without blur.
Remember, the key is to use the lowest ISO possible while still achieving the desired exposure and creative effect. Don’t be afraid to experiment with different ISO settings to find the sweet spot for each unique shooting situation.
Minimizing Noise
Minimizing noise is key to capturing high-quality images, especially in low-light situations. The primary culprit behind noisy photos is high ISO settings. ISO determines your camera’s sensitivity to light. While bumping up the ISO lets you shoot in darker environments without slowing your shutter speed, it comes at the cost of increased noise or grain.
To keep noise at bay, always aim to use the lowest ISO that still allows for a proper exposure. In bright daylight, stick to ISO 100-400. Only raise it as needed in dimmer conditions. Investing in fast lenses with wide maximum apertures like f/1.8 allows you to keep ISO lower in low light.
Shooting in RAW also provides more flexibility to reduce noise in post-processing compared to JPEGs. Most importantly, get familiar with your camera’s high ISO performance through experience – every model handles noise differently at higher settings. By understanding your gear’s limitations, you can make smarter ISO choices in the field to minimize noise while still getting the shot.
Metering Modes: Measuring the Light
Measuring the light that enters your camera is crucial for achieving proper exposure. That’s where metering modes come into play. Most cameras offer three main metering modes: evaluative (or matrix), center-weighted, and spot metering.
Evaluative metering takes into account the entire scene, analyzing various zones to determine the best overall exposure. This mode works well for evenly lit scenes where there aren’t extreme differences between the brightest and darkest areas. It’s a good default choice for general photography.
Center-weighted metering prioritizes the central area of the frame while still considering the rest of the image. This mode is useful when your subject is in the middle of the frame and you want to ensure it’s properly exposed, even if the background is brighter or darker.
Spot metering is the most precise option, measuring only a small area (usually 1-5% of the frame) where you point the camera. This mode is ideal for high-contrast scenes where you want to prioritize the exposure of a specific subject, such as a performer on a stage with a dark background. By spot metering on the performer’s face, you can ensure they are correctly exposed, even if it means the background becomes over or underexposed.
To select your metering mode, look for a button or menu option on your camera labeled “metering” or with an icon resembling an eye. Experiment with different modes in various lighting situations to see how they affect your exposures. Remember, you can always use exposure compensation to fine-tune the result if needed.
Focus Modes: Nailing Sharpness
Nailing focus is crucial for capturing tack-sharp images. Modern cameras offer various autofocus (AF) modes designed for different scenarios. Single AF, also known as One-Shot AF on Canon or AF-S on Nikon, is ideal for stationary subjects. Half-press the shutter button to lock focus, then fully press to capture the shot. This mode prevents the camera from refocusing if you or the subject moves slightly.
For moving subjects, like wildlife or sports, switch to Continuous AF (AI Servo AF on Canon / AF-C on Nikon). In this mode, the camera continuously adjusts focus as long as you half-press the shutter button, tracking the subject’s movement. To maximize success, use the camera’s dynamic or tracking AF area modes, which intelligently follow the subject across the frame.
Most cameras also offer automatic AF mode selection (AI Focus AF on Canon / AF-A on Nikon) that chooses between single and continuous AF based on subject movement. While convenient, this mode may not always select the optimal setting, so it’s best to choose deliberately based on your subject.
Mastering manual focus is worthwhile for tricky focusing scenarios like macro, low light, or low-contrast scenes. Switch the lens to MF mode, then rotate the focus ring until the subject appears sharp. Many cameras offer focus peaking and magnification to aid manual focusing precision.
Lastly, consider back-button focus – assigning AF to a rear button instead of the shutter. This separates focusing from the shutter release, allowing you to track subjects or lock focus independently. With practice, these focusing techniques will become second nature, empowering you to capture pin-sharp images in any situation.
Conclusion
With practice and experimentation, you’ll gain a better understanding of how aperture, shutter speed, ISO, metering modes and focus modes interact to shape your images. Don’t be afraid to play around with different combinations of settings – trial and error is a great teacher! The more you shoot in manual mode and take control of these variables, the more instinctive it will become.
Remember, these basic camera settings are the foundation upon which all your future photographic knowledge will be built. Mastering them gives you the power to translate the artistic visions in your mind into stunning images. So keep your camera close at hand, stay curious, and most importantly – have fun! With time and practice, you’ll be amazed at the beautiful photos you can create by strategically manipulating light and motion. The photographic world is your oyster – now go explore it, one click at a time!