Transform your smartphone into a professional-grade camera by mastering the hidden features beneath that familiar camera icon. Today’s devices pack sophisticated imaging technology that rivals dedicated cameras, allowing anyone to capture stunning shots with minimal equipment.
From computational photography that enhances low-light performance to AI-powered scene optimization, modern smartphone cameras represent a quantum leap in mobile imaging capabilities. These advanced features, once exclusive to high-end DSLR cameras, now fit perfectly in your pocket, democratizing professional-quality photography for everyone.
Whether you’re documenting life’s precious moments or creating content for social media, understanding your smartphone’s camera features unlocks creative possibilities that transcend basic point-and-shoot photography. Night mode, portrait lighting, RAW capture, and pro-level manual controls await discovery – powerful tools that elevate your mobile photography from simple snapshots to gallery-worthy images.
This guide explores the essential camera features built into today’s smartphones, revealing how to harness their full potential without investing in expensive external gear. Let’s dive into the techniques and settings that will transform your mobile photography journey.
Pro-Level Camera Controls Hidden in Your Phone
Manual Mode Mastery
Taking control of your smartphone’s manual camera settings opens up a world of creative possibilities. By mastering these manual camera techniques, you’ll capture images with professional-level precision.
ISO controls your camera’s sensitivity to light. In bright conditions, keep it low (100-200) to minimize noise. When shooting in darker environments, increase it (400-3200), but be mindful that higher ISOs introduce more grain.
Shutter speed determines how long your sensor captures light. Fast speeds (1/1000th second or quicker) freeze motion, perfect for sports or wildlife. Slower speeds (1/60th or longer) create artistic motion blur and work wonderfully for nighttime light trails.
Exposure control balances these elements with aperture settings. Think of it as fine-tuning the overall brightness of your image. Most smartphones offer exposure compensation (usually +/- 2 stops), allowing you to brighten or darken your shot intentionally.
Remember to experiment with different combinations. Start in well-lit conditions where you can clearly see the effects of your adjustments, then gradually tackle more challenging lighting situations as your confidence grows.

RAW Shooting and HDR
RAW shooting and HDR are two powerful features that can dramatically enhance your smartphone photography. RAW format captures all the data from your camera sensor, giving you greater flexibility in post-processing. Unlike JPEG files, RAW images retain details in shadows and highlights, allowing you to adjust exposure, white balance, and color with minimal quality loss.
To shoot in RAW, simply enable it in your camera settings. Keep in mind that RAW files take up significantly more storage space and require editing software to process. However, the creative control you gain makes it worthwhile, especially for challenging lighting situations or when you want to achieve a specific artistic vision.
HDR (High Dynamic Range) is equally valuable, particularly for scenes with bright and dark areas. When enabled, your phone takes multiple photos at different exposures and combines them into a single image with better detail throughout. It’s perfect for landscape photography where you want to capture both detailed clouds and shadowed foregrounds. For best results, keep your phone steady when shooting HDR, as any movement can create ghosting artifacts. While HDR works great in many situations, avoid using it for moving subjects or when you want to preserve dramatic shadows for artistic effect.
Focus and Exposure Locks
Focus and exposure locks (AE/AF) are powerful tools that give you precise control over your smartphone photography. By tapping and holding on your screen, you can lock both focus and exposure settings, allowing you to recompose your shot without the camera automatically adjusting these values. This is particularly useful when photographing backlit subjects or creating dramatic compositions where your main subject isn’t centered.
To use these locks effectively, first tap where you want to focus, then hold until you see the AE/AF lock indicator. Once locked, you can slide your finger up or down to fine-tune the exposure. This technique is invaluable for tricky lighting situations, like shooting through windows or capturing sunsets where you want to maintain detail in both highlights and shadows.
Professional tip: Use AE/AF locks when photographing moving subjects by pre-focusing on their expected position. This reduces shutter lag and helps capture decisive moments with perfect clarity.
AI-Powered Photography Features
Scene Optimization
Modern smartphones employ sophisticated AI scene detection that works like a knowledgeable photography assistant. When you point your camera at a subject, the AI analyzes the scene in real-time, identifying elements like faces, food, landscapes, or night scenes. It then automatically adjusts settings like exposure, contrast, and color balance to optimize the shot.
While this technology is impressive, there are times when you might want to override these automatic adjustments. For instance, when shooting a sunset, AI might try to brighten the shadows, reducing the dramatic effect you’re aiming for. Similarly, portrait mode might activate when you’re trying to capture a subject within its environment, artificially blurring important context.
To get the best results, learn to read your scene and recognize when AI might misinterpret your creative intent. Most camera apps allow you to disable scene optimization with a single tap. Try taking the same shot with and without AI assistance to understand its impact. This practice will help you develop intuition about when to trust the AI and when to take manual control, ultimately leading to more intentional and artistic photographs.
Portrait Mode Capabilities
Portrait mode has revolutionized smartphone photography by bringing professional-looking depth effects to everyone’s pocket. Modern smartphones use a combination of multiple cameras and AI algorithms to create that coveted background blur, mimicking the bokeh effect traditionally achieved with expensive DSLR lenses. While mastering these features might seem daunting, following some professional photography tips can help you create stunning portraits.
Most smartphones offer various lighting options within portrait mode, including natural, studio, contour, and stage lighting effects. These presets can dramatically transform your portraits, adding depth and dimension to faces. For best results, maintain a distance of 2-8 feet from your subject, ensuring their face is well-lit and clearly defined against the background.
Remember that portrait mode isn’t just for faces – it works beautifully with objects too. Try capturing flowers, food, or other still-life subjects with a beautifully blurred background. The key is maintaining proper distance and ensuring there’s enough separation between your subject and the background for the effect to work naturally.
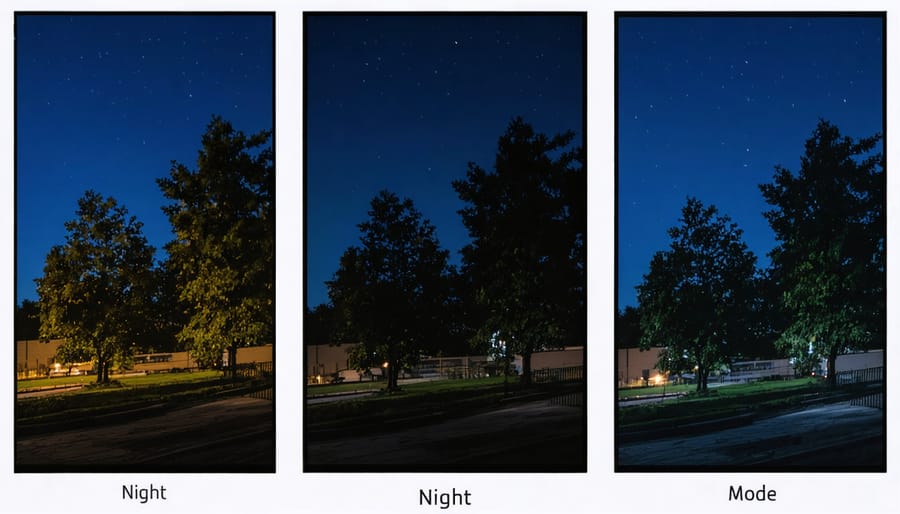
Night Mode Photography
Night mode photography has revolutionized how we capture moments in low-light conditions. Modern smartphones use a combination of advanced software algorithms and hardware capabilities to transform dark scenes into bright, detailed images. When shooting in night mode, your phone typically takes multiple exposures over several seconds and combines them to create a single, well-exposed photo while minimizing noise and blur.
To achieve the best results, stability is crucial. Rest your phone against a stable surface or use your elbows as a makeshift tripod. Many phones will automatically detect when they’re stable and extend the exposure time for even better results. Keep in mind that moving subjects might appear blurry, so night mode works best with static scenes like cityscapes or architecture.
For optimal night shots, look for scenes with some available light sources, such as street lamps or illuminated buildings. These elements not only add interesting points of focus but also help your phone’s AI better process the scene. Most smartphones now offer manual controls in night mode, allowing you to adjust focus points and exposure levels for more creative control over your final image.
Video Features Worth Knowing
Stabilization Options
Camera shake can ruin even the most perfectly composed shots, which is why modern smartphones come equipped with powerful stabilization features. The two main types you’ll encounter are Optical Image Stabilization (OIS) and Electronic Image Stabilization (EIS), often working in tandem to deliver steady footage.
OIS uses physical hardware components – tiny gyroscopes and motors that actually move your camera lens to counteract hand movements. This is particularly effective in low-light situations where longer exposure times are needed, helping you capture crisp images even when holding your phone by hand.
EIS, on the other hand, works through software algorithms that analyze and adjust your footage in real-time. While it doesn’t help with photo blur like OIS does, it’s exceptional for video recording, especially when walking or capturing action scenes. Many recent smartphones combine both technologies into what’s often called “Hybrid Stabilization.”
Most flagship phones now offer specialized stabilization modes for different scenarios. “Action mode” or “Steady mode” are perfect for high-movement situations like running or sports photography, while “Night mode” stabilization helps capture sharp images in dark environments by compensating for the longer exposure times needed.
For the best results, even with these advanced features, try to maintain a stable stance and grip when shooting. Keep your elbows tucked in and use both hands to hold your device whenever possible.
Pro Video Settings
Modern smartphones offer impressive video capabilities that rival dedicated cameras. Frame rates have become increasingly versatile, with most flagship devices supporting 24fps for a cinematic look, 30fps for standard recording, and 60fps for smooth motion. Some models even push the boundaries with 120fps or 240fps options, perfect for creating dramatic slow-motion sequences.
Resolution options typically range from 720p to 4K, with some premium devices now offering 8K recording. While 4K at 30fps provides an excellent balance between quality and file size, you might want to stick with 1080p for everyday recordings to conserve storage space. Remember that higher resolutions require more processing power and storage capacity.
When it comes to codecs, H.264 remains the most widely compatible option, but newer devices support H.265 (HEVC), which offers better compression while maintaining quality. Some smartphones even provide ProRes or LOG formats, giving professional users more flexibility in post-production color grading.
For the best results, match your settings to your intended use. Shooting a family gathering? 1080p at 30fps will serve you well. Creating content for YouTube? Consider 4K at 24fps for that professional look. Remember that lighting conditions can affect your choice – higher frame rates require more light, so you might need to adjust accordingly in dimmer situations.
Camera Apps and Software Integration
Native Editing Tools
Modern smartphones come equipped with sophisticated editing tools that rival desktop software, making it easier than ever to enhance your photos and videos right on your device. These built-in features have significantly expanded smartphone camera capabilities, allowing photographers to perfect their shots without additional apps.
Most native editing suites offer essential adjustments like exposure, contrast, and saturation controls. You’ll find intelligent auto-enhance options that analyze your image and suggest improvements, perfect for quick edits on the go. Portrait mode photos can be refined after capture, allowing you to adjust background blur, lighting effects, and even change the focal point.
Advanced tools include selective editing, where you can adjust specific areas of your image while leaving others untouched. Healing tools help remove unwanted objects or blemishes, while AI-powered features can enhance sky colors or create natural-looking HDR effects.
For video editing, built-in tools typically offer trim and merge capabilities, basic color correction, and the ability to add music or text overlays. Some manufacturers include specialized features like cinematic effects, slow-motion adjustment, and stabilization fine-tuning.
Remember that while these native tools are impressive, they’re designed to balance functionality with ease of use, making them ideal for quick edits and social media sharing.
Cloud Integration
Cloud integration has revolutionized how we store and manage our smartphone photos, offering seamless backup solutions that protect our precious memories. Most modern smartphones come with native cloud services – iCloud for iPhone users and Google Photos for Android devices – that automatically sync your photos as you capture them.
These cloud services do more than just store your images. They use sophisticated AI to organize your photos by faces, places, and even objects, making it easier to find specific shots later. You can create shared albums for family events, automatically free up device storage when photos are safely backed up, and access your entire photo library from any connected device.
What’s particularly convenient is the automatic backup feature. Once enabled, your photos sync to the cloud whenever you’re connected to Wi-Fi, ensuring you never lose a shot even if your phone is damaged or stolen. Many services offer basic storage tiers for free, with affordable upgrades available when you need more space.
For photographers who shoot extensively, these cloud services also maintain your photos’ original quality and metadata, though some compression may occur depending on your storage plan. Some services even offer basic editing tools and smart suggestions for creating albums or animations from your photos.
Modern smartphone cameras are remarkable tools that put professional-level photography capabilities right in your pocket. Throughout this article, we’ve explored the extensive range of native features that make this possible, from basic exposure controls to advanced computational photography techniques. The key takeaway is that you don’t need expensive accessories or third-party apps to capture stunning images – your smartphone’s built-in features are often more than sufficient.
Remember that great photography isn’t just about having the latest features, but understanding how to use them effectively. Start with mastering the basics like HDR, portrait mode, and night mode before diving into more advanced techniques. Don’t be afraid to experiment with different settings and compositions; sometimes the most impressive shots come from unexpected combinations of features.
Take time to explore your camera app’s settings menu thoroughly – you might discover useful features you didn’t know existed. Practice using these tools in various lighting conditions and scenarios to understand their strengths and limitations. The more familiar you become with your smartphone’s native camera features, the more naturally you’ll be able to select the right tools for any given situation.
As smartphone camera technology continues to evolve, staying current with your device’s capabilities will help you make the most of every photo opportunity. Whether you’re capturing family moments or creating professional content, your smartphone’s native camera features provide a powerful foundation for your photographic journey.