Transform your everyday smartphone snapshots into captivating photographs by mastering these essential smartphone photography secrets. Tap your screen to set focus and exposure separately, creating professional-looking depth and perfectly lit subjects. Hold your phone with both hands, elbows tucked against your body, to eliminate camera shake and capture razor-sharp images in any lighting condition. Clean your smartphone’s lens before every shooting session – this simple yet crucial step prevents hazy, low-contrast photos that plague beginners.
The power to create stunning photographs lives in your pocket, but technical expertise isn’t the key to unlocking it. Today’s smartphones pack professional-grade cameras with intelligent features that do the heavy lifting, leaving you free to focus on what matters most: developing your creative eye and mastering fundamental composition techniques.
Whether you’re documenting daily life or pursuing artistic expression, this guide will help you harness your smartphone’s full potential without getting lost in complex technical jargon. Learn to work with natural light, frame compelling shots, and edit with confidence – all using the device you already carry everywhere.
Master Your Phone Camera’s Basic Settings
Focus and Exposure Controls
One of the most essential camera features on your smartphone is the ability to control focus and exposure with just a tap. To focus on your subject, simply tap the area on your screen where you want the camera to direct its attention. You’ll usually see a yellow or white box appear, indicating the focus point.
But did you know you can also adjust the exposure (brightness) of your image using the same interface? After tapping to focus, most smartphones allow you to slide your finger up or down to adjust the exposure. Sliding up makes the image brighter, while sliding down darkens it. This is particularly useful when photographing subjects against bright backgrounds or in challenging lighting conditions.
For more precise control, try tapping and holding on your subject. This will usually lock both focus and exposure, indicated by “AE/AF Lock” on many phones. This feature is invaluable when you want to recompose your shot without the camera readjusting its settings.
Remember that your phone’s auto-focus system works best with subjects that have clear contrast and defined edges. If you’re having trouble getting a sharp focus, try tapping on an area with distinct lines or patterns near your subject.
HDR and When to Use It
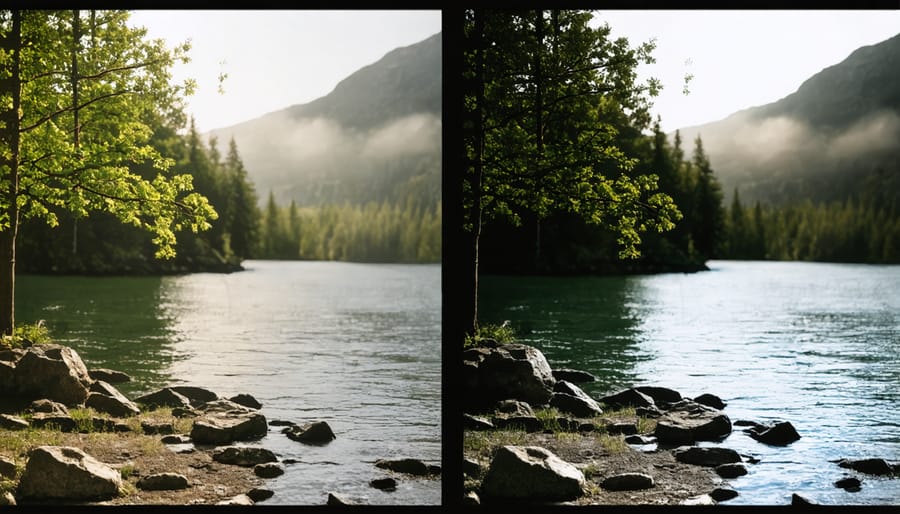
HDR (High Dynamic Range) is a powerful feature in your smartphone camera that can dramatically improve photos in challenging lighting conditions. When enabled, your phone takes multiple photos at different exposure levels and combines them into a single image that captures both bright and dark areas with impressive detail.
Think of HDR as your camera’s way of seeing the world more like your eyes do. It’s particularly effective in scenes with strong contrast, such as landscapes where you want to capture both a bright sky and darker foreground. HDR works best in situations like:
• Shooting outdoors on sunny days when shadows are harsh
• Capturing sunset scenes where the sky is bright but the landscape is darker
• Taking photos of backlit subjects
• Indoor shots with bright windows in the frame
• Landscape photography with both bright skies and shadowy areas
However, HDR isn’t always the best choice. Avoid using it when:
• Photographing moving subjects (as multiple exposures can create ghosting)
• Capturing scenes where you want to maintain strong contrast intentionally
• Taking photos in low-light conditions where your subject is already well-exposed
Most modern smartphones have automatic HDR modes that activate when needed, but learning when to manually enable or disable it can give you more control over your final image. Start by experimenting with HDR in high-contrast scenes, and you’ll quickly develop an intuition for when it will enhance your photos.
Composition Techniques Anyone Can Master
Rule of Thirds Made Simple
The rule of thirds is your secret weapon for instantly better smartphone photos, and it’s easier to master than you might think. Imagine dividing your phone screen into a 3×3 grid (most phones can display this grid in your camera settings). The magic happens where these lines intersect – these are your power points for composition.
When framing your shot, try placing your main subject at one of these intersections rather than dead center. For example, if you’re photographing a friend, position their face near one of the upper intersection points. For landscape shots, align the horizon with either the top or bottom horizontal line instead of cutting your frame in half.
The beauty of using the rule of thirds on smartphones is that most camera apps come with built-in grid overlays. To activate this feature on iPhone, go to Settings > Camera > Grid. For Android users, look for the grid option in your camera settings. This visual guide makes it incredibly easy to practice these pro composition techniques while shooting.
Remember, this rule isn’t set in stone – think of it more as a helpful guideline. Sometimes, breaking it intentionally can create striking images. Start by consciously using the grid for every shot you take. Soon, you’ll develop an intuitive sense of composition that will make your photos more visually appealing without even thinking about it.
Quick tip: When reviewing your photos, check if your subject falls near these intersection points. If not, most phone galleries allow you to crop and adjust the composition afterward to better align with the rule of thirds.

Leading Lines in the Real World
Leading lines are everywhere in our daily lives, and once you start looking for them, you’ll be amazed at how many photography opportunities you’ll discover. Start by observing your surroundings during your daily routine. City streets offer perfect examples, with sidewalks, building edges, and road markings naturally drawing the eye through your frame.
In architecture, staircases, hallways, and bridges provide compelling leading lines that create depth and perspective. Even simple features like fences, railings, or power lines can transform an ordinary scene into a visually striking composition. When photographing these elements, position yourself to maximize their impact – try shooting from different angles to see how the lines change and guide your viewer’s attention.
Natural environments are equally rich in leading lines. Tree-lined paths, shorelines, and rivers create organic paths for the eye to follow. Even fallen logs, rock formations, or rows of flowers can serve as effective leading lines in landscape photography. The key is to identify these elements and use them intentionally in your composition.
For the best results, place your subject where the leading lines converge or intersect. This technique works particularly well for portraits – try positioning your subject at the end of a path or where building lines meet. When shooting with your smartphone, use the grid feature to help align these lines with the frame’s natural divisions.
Remember that leading lines don’t always need to be straight. Curved paths, winding roads, or spiral staircases can create even more dynamic and engaging compositions. The goal is to use these lines to tell a story and guide your viewer through the image.
Light: Your Secret Weapon
Natural Light Tips
Natural light is your smartphone camera’s best friend, and learning to work with it can dramatically improve your photos. The key is understanding how different types of light affect your images throughout the day.
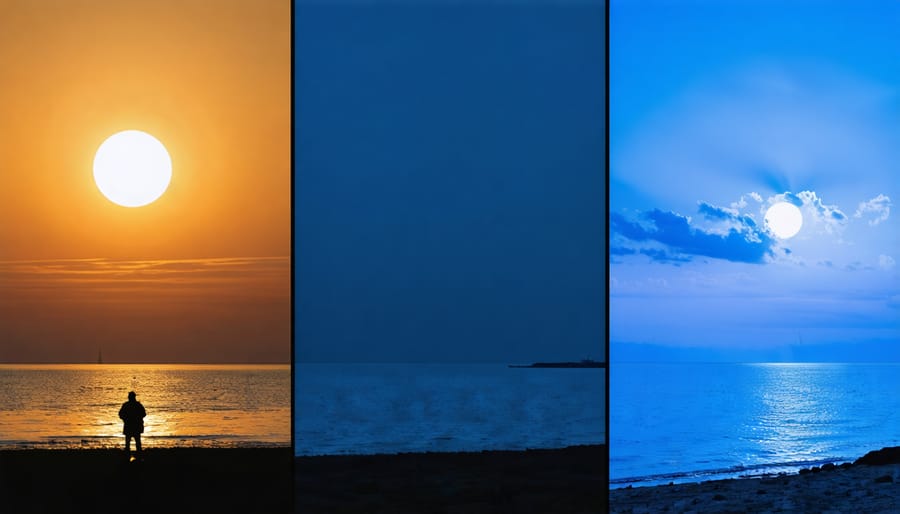
During the “golden hours” (just after sunrise and before sunset), the sun creates warm, soft lighting that’s perfect for most subjects. This light produces gentle shadows and adds a beautiful golden glow to your photos. Try shooting during these times for portraits or landscape shots that really pop.
Avoid shooting in harsh midday sun, as it creates unflattering shadows and can wash out your subjects. If you must shoot during these hours, find some shade or wait for clouds to diffuse the light. Cloudy days actually provide excellent lighting conditions, acting like a giant softbox that creates even, flattering light.
When shooting indoors, position your subject near windows to take advantage of natural light. Face your subject towards the window for even illumination, or capture them from the side for more dramatic shadows and depth. Remember to tap on your subject’s face in the camera app to ensure proper exposure.
For backlit situations, try using your phone’s HDR mode to balance bright backgrounds with darker subjects. You can also create silhouettes by deliberately exposing for a bright background, turning your subject into a dramatic dark shape against the light.
Experiment with different angles relative to the light source to see how it affects your images. Sometimes, moving just a few steps can transform an ordinary photo into something special.
Dealing with Tricky Lighting
Tricky lighting situations can make or break your smartphone photos, but don’t worry – there are several effective techniques to handle these challenges. When dealing with harsh sunlight, try positioning your subject in the shade or use the “golden hours” (just after sunrise or before sunset) for softer, more flattering light. If you must shoot in bright sun, use your hand or a small piece of cardboard to create a makeshift shade above your phone to prevent lens flare.
For low-light situations, avoid using your phone’s flash as it often creates unflattering, harsh shadows. Instead, look for alternative light sources like street lamps, store windows, or even your friend’s phone light. Keep your phone as steady as possible – try bracing your elbows against your body or finding a stable surface to rest your phone on. Many newer smartphones have a night mode feature, which can capture impressive shots in dark conditions if you can hold your phone still for a few seconds.
Backlit scenes can be particularly challenging, but they also offer creative opportunities. Try tapping on your subject’s face to adjust exposure, or experiment with silhouettes by deliberately underexposing. For indoor shots with mixed lighting, tap to focus on the most important part of your scene and adjust the exposure slider to find the right balance between highlights and shadows.
Remember that challenging lighting can create unique and dramatic effects when used intentionally – don’t be afraid to experiment and break the rules sometimes!
Quick Editing Tricks That Make a Difference
Essential Adjustments
Even the best smartphone photos often need a few tweaks to achieve professional-looking results. Fortunately, your smartphone’s built-in editing tools are more than capable of handling these essential adjustments.
Start with brightness, which can make or break your image. If your photo appears too dark or washed out, drag the brightness slider gradually until the main subject looks naturally illuminated. Remember, subtle changes often work better than dramatic ones.
Contrast adds depth and helps separate elements in your image. Increasing contrast makes dark areas darker and bright areas brighter, which can add pop to a flat-looking photo. However, be careful not to overdo it – too much contrast can make your image look artificial and lose detail in shadows and highlights.
Color adjustments can breathe life into your photos. The warmth (or temperature) slider helps correct unwanted color casts – sliding towards blue counteracts orange tints, while sliding towards yellow warms up overly cool images. Saturation controls the intensity of colors; a slight boost can make colors more vibrant, but pushing it too far can make your photo look unrealistic.
Keep these adjustments subtle and natural-looking. A good rule of thumb is to make your adjustments, then reduce them by about 25% – this helps avoid over-processing. If you’re unsure, step away from the edit for a few minutes, then come back with fresh eyes. The goal is to enhance your image while maintaining its natural appeal.
Common Editing Mistakes to Avoid
When editing your smartphone photos, it’s easy to fall into common traps that can make your images look unprofessional or artificial. One of the most frequent mistakes is over-saturation, where colors become unnaturally vibrant and lose their realistic appeal. Instead, make subtle adjustments to enhance the natural colors without pushing them too far.
Another pitfall is excessive HDR (High Dynamic Range) processing, which can create an unrealistic, almost cartoon-like effect. While HDR can be useful in balancing exposure, use it sparingly to maintain the photo’s natural look. Similarly, avoid cranking up the sharpness too high, as this can create unsightly halos around objects and make your images appear harsh.
Heavy-handed filtering is another common mistake. While Instagram-style filters can be fun, they often mask the true beauty of your original image. If you’re interested in advanced editing techniques, focus on making selective adjustments rather than applying one-size-fits-all filters.
Watch out for over-cropping, which can reduce image quality and limit your printing options. Always consider your final output when deciding how much to crop. Additionally, be cautious with skin smoothing features – excessive use can make portraits look artificial and waxy.
Finally, remember to save your original photos before editing. Many beginners make the mistake of overwriting their originals, leaving no way to start fresh if they’re unhappy with their edits. Most editing apps automatically save originals, but it’s worth double-checking your settings to ensure you’re protected.

As we’ve explored throughout this guide, smartphone photography is an accessible and rewarding pursuit that anyone can master with practice and patience. Remember that the fundamentals we’ve covered – understanding your phone’s camera settings, mastering composition techniques, and learning to work with available light – are just the beginning of your photography journey.
The best way to improve your smartphone photography skills is to practice regularly. Challenge yourself to take photos every day, even if it’s just capturing simple moments around your home. Don’t be afraid to experiment with different angles, lighting conditions, and subjects. The beauty of digital photography is that you can take hundreds of shots without worrying about waste.
Keep in mind that great photos don’t always come from having the latest smartphone or the most expensive accessories. Often, they result from understanding basic principles and applying them creatively. Start with the techniques we’ve discussed, but don’t hesitate to break the rules once you’re comfortable with them.
As you continue developing your skills, remember to back up your photos regularly and take time to review your work. Looking at your previous shots can help you identify areas for improvement and track your progress over time.
Most importantly, enjoy the process. Smartphone photography should be fun and creative, allowing you to capture and share the world as you see it. With practice and persistence, you’ll soon be taking photos you’re proud to share.