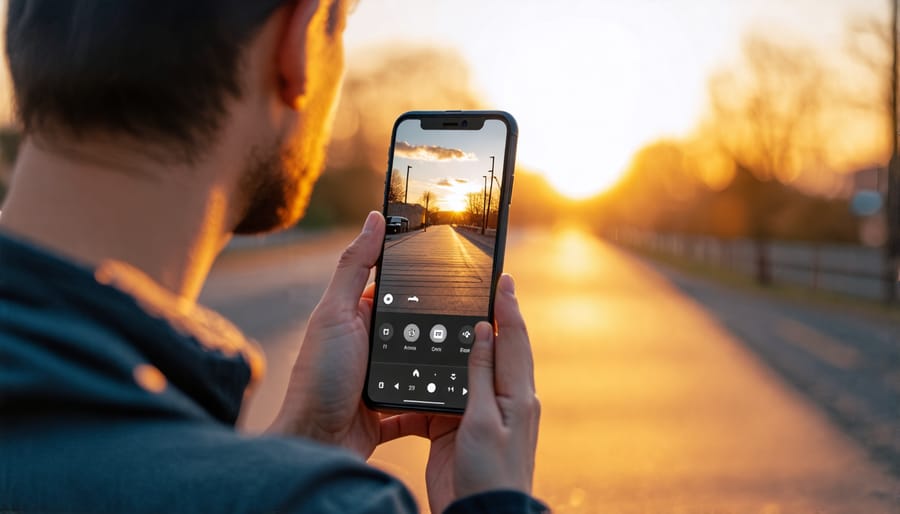
Adjust exposure by tapping your smartphone screen and sliding the brightness scale. Tap-to-focus to sharpen your subject and blur the background for a shallow depth of field. Use gridlines to apply the rule of thirds for balanced, visually appealing compositions. Stabilize your phone with both hands, lean against a wall, or use a tripod to minimize camera shake and capture sharper images. Experiment with free mobile editing apps to enhance contrast, saturation, and white balance for more vibrant, professional-looking photos.
Master Your Camera App Settings
Exposure
Exposure refers to the amount of light that reaches your camera’s sensor, determining how bright or dark your photo appears. On most smartphones, you can adjust exposure by tapping on the screen and sliding the brightness scale up or down. If your photo looks too dark, increase the exposure to let in more light. Conversely, if it’s overexposed and washed out, reduce the exposure. Play around with this setting in various lighting conditions to get a feel for how it affects your images. Remember, slight underexposure often retains more detail than overexposure, as you can brighten shadows but can’t recover blown-out highlights.
Focus and Exposure Lock
To achieve sharp focus and optimal exposure on your phone camera, tap on your main subject on the screen. This will set the focus point and adjust exposure based on that area. Once set, press and hold until you see “AF/AE Lock” (or similar) to lock the focus and exposure settings. Now, even if you move the camera or the subject moves, the focal point and exposure will remain constant. This is especially useful in tricky lighting situations like backlighting, where tapping on a shadowed face will brighten the exposure to capture more detail. Experiment with locking focus and exposure on different parts of the scene for creative control over the final image.
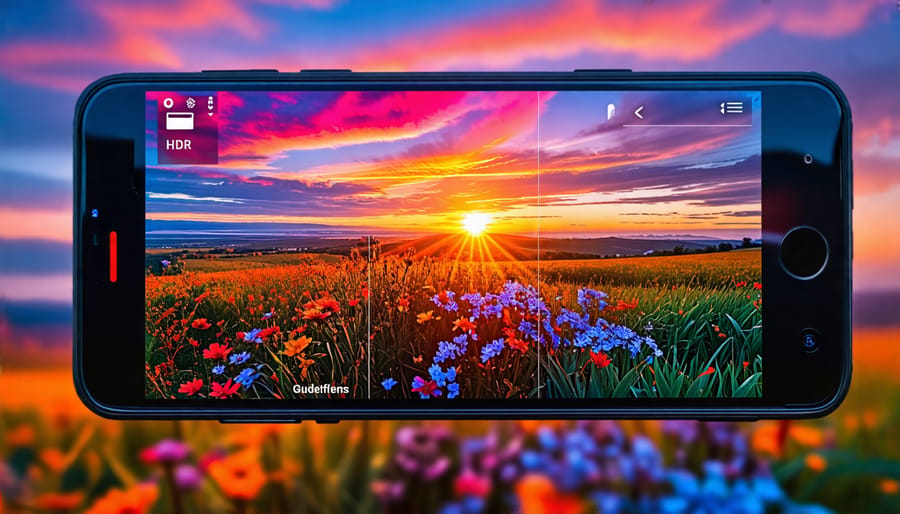
HDR Mode
HDR, or High Dynamic Range, is a camera mode that helps capture more detail in high-contrast scenes. When you encounter a situation with both very bright and very dark areas, like a sunset or a backlit subject, HDR can help balance the exposure. In HDR mode, your phone takes multiple shots at different exposures and combines them into a single image, preserving details in both the highlights and shadows. This results in a more evenly exposed photo that closely matches what your eyes see. Keep in mind that HDR works best for stationary subjects, as any movement between the multiple exposures can cause blurriness or ghosting artifacts in the final image.
Embrace Natural Light
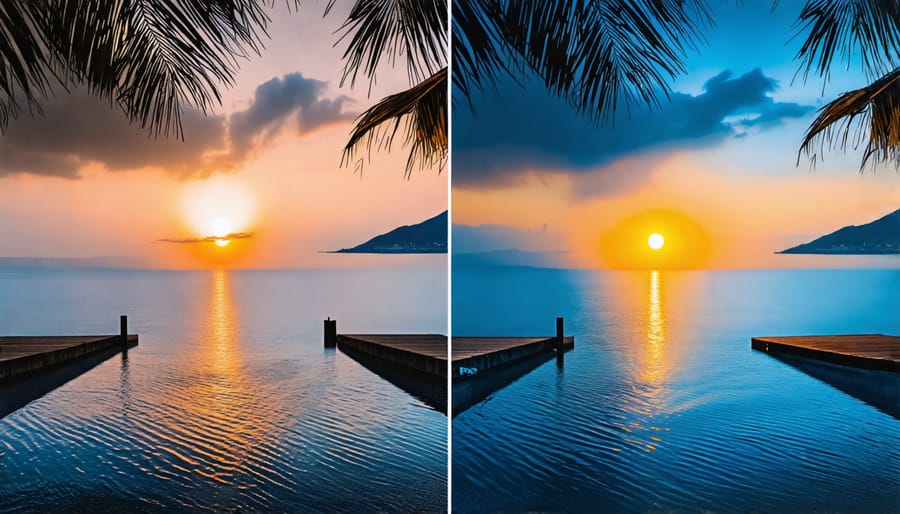
Good lighting is essential for capturing stunning photos with your smartphone. While your device’s flash can help in low light, it often produces harsh shadows and unflattering results. Instead, embrace the power of natural light whenever possible. Soft, diffused natural light is ideal for most photography scenarios. It creates even illumination, minimizes shadows, and brings out the natural colors and textures of your subject. The golden hours just after sunrise and before sunset are particularly magical, bathing everything in a warm, golden glow. When shooting outdoors, position your subject so the light hits them from the side or front, rather than directly overhead which can create harsh shadows. If the light is too bright, try moving to a shaded area or using a diffuser to soften the illumination. Indoors, place your subject near a window to take advantage of the soft, indirect light. Sheer curtains can help diffuse the light further if needed. Pay attention to how the light falls across your subject’s face – you generally want to avoid strong shadows under the eyes or nose. Experiment with backlighting for a dreamy, ethereal effect. Position your subject with the light source behind them, and adjust your exposure to ensure they are still properly lit from the front. This technique works beautifully with translucent subjects like leaves or fabrics. Remember, the key is to observe how the light interacts with your scene and subject. Take test shots from different angles and adjust your position until you find the most flattering and impactful lighting. With practice, you’ll develop an eye for seeking out beautiful natural light to elevate your smartphone photography.
Compose Like a Pro
Rule of Thirds
The rule of thirds is a fundamental composition guideline that divides the frame into a 3×3 grid. To use this technique, imagine two equally spaced horizontal lines and two vertical lines crossing your screen, creating nine equal rectangles. The key is to position your main subject along one of these lines or at their intersections. This off-center composition creates a more balanced, natural, and engaging image compared to placing the subject directly in the middle. Experiment with placing horizons along the upper or lower horizontal line, or align vertical elements like trees or buildings with one of the vertical lines. With practice, the rule of thirds will become second nature, elevating your mobile photography compositions.
Leading Lines
Leading lines are a powerful compositional tool that can add depth and guide the viewer’s eye through your smartphone photos. Look for natural or man-made lines in your scene, such as roads, paths, fences, or even patterns in the sand. Position these lines to draw the eye towards your main subject or lead it into the distance, creating a sense of journey and depth. Experiment with different angles and perspectives to emphasize the lines and create dynamic compositions. By strategically incorporating leading lines, you can elevate your mobile photography and engage viewers more effectively.
Framing
Framing your subject with natural elements can take your mobile photos to the next level. Look for windows, arches, or even tree branches that can create a frame around your main subject. This technique helps to draw the viewer’s eye towards the focal point of your image, while also adding depth and context to the scene. Experiment with different angles and positions to find the most compelling framing. Remember, the frame doesn’t have to completely surround your subject – even a partial frame can be effective in highlighting the key elements of your composition. With a bit of practice and creativity, you’ll soon be using natural frames to elevate your smartphone photography.
Symmetry and Patterns
Symmetry and repetitive patterns naturally draw the eye, creating compelling compositions. When framing your shot, look for scenes with mirrored elements or recurring shapes. Reflections in water, architectural features, or even shadows can offer striking symmetry. Repeating patterns, like a row of trees or a tiled floor, add visual rhythm and texture. Experiment with different angles to emphasize these elements. Remember, perfect symmetry isn’t always necessary; near-symmetrical compositions can be just as impactful. By incorporating symmetry and patterns, you’ll create images with a strong visual appeal that engage viewers and elevate your mobile photography.
Get Close for Impact
Getting close to your subject can create powerful, impactful photographs that draw the viewer in. Don’t be afraid to fill the frame with your subject, whether it’s a person’s face, a flower, or an architectural detail. This technique eliminates distracting backgrounds and focuses attention on the most important elements. For example, a close-up shot of a person’s eyes can convey deep emotion and create a sense of intimacy. Getting close to a flower can reveal intricate details and textures that might be missed from a distance. Filling the frame with a bold architectural feature can emphasize its geometry and create a striking abstract composition. When shooting close-ups, pay attention to your camera’s minimum focusing distance. Most smartphones can focus on subjects just a few inches away, but for even closer shots, consider using an add-on macro lens. Experiment with different angles and perspectives to find the most compelling way to showcase your subject. Remember, getting close is about more than just physical proximity. It’s about creating a sense of connection between the subject and the viewer. By filling the frame and eliminating distractions, you can create images that are both visually striking and emotionally engaging.
Keep It Steady
Blurry photos can be frustrating, but there are several techniques you can use for reducing blur and capturing sharp, steady shots with your smartphone. One simple method is to brace your phone against a solid object, like a wall, table, or tree, to minimize hand movement. If no stable surfaces are available, try holding your breath while gently pressing the shutter button to avoid jostling the camera. Another handy trick is to use your phone’s volume buttons to snap the picture, which can help prevent the slight shake that often occurs when tapping the on-screen shutter button. For even greater stability, consider enabling your phone’s burst mode, which rapidly takes multiple shots in quick succession. This increases the likelihood of capturing at least one crisp image, even if your hands are a bit unsteady. In low-light situations, where slower shutter speeds are necessary, it’s especially important to keep your phone as still as possible. Resting your elbows on a table or even sitting down can provide additional support. If you frequently shoot in challenging lighting conditions, investing in a small, portable tripod designed for smartphones can make a world of difference in the sharpness and clarity of your photos. Remember, a steady camera is key to capturing blur-free images, so experiment with these techniques and find the ones that work best for you and your smartphone photography adventures.
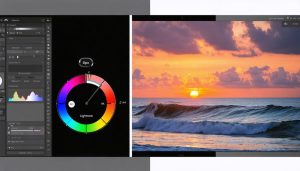
Edit to Enhance
Now that you’ve captured some great shots, it’s time to fine-tune them using the editing tools in your favorite mobile app. Even basic adjustments can dramatically enhance your photos. Start by cropping your image to remove any distracting elements and create a more compelling composition. Experiment with different aspect ratios to see what works best for your subject matter. Next, take a look at the exposure. If your image is too dark or too bright, use the exposure slider to make adjustments. Be careful not to overdo it, as this can result in a loss of detail or an unnatural look. You can also try adjusting the contrast, highlights, shadows, and white balance to create a more balanced and visually appealing image. Finally, have some fun with filters! Many mobile editing apps offer a variety of preset filters that can instantly transform the mood and style of your photos. Play around with different options to see what works best for your particular image. Remember, the key is to enhance your photo without losing its natural essence. With a bit of practice and experimentation, you’ll soon be able to take your mobile photos to the next level using these basic editing tips.